A Creative Mind

A Creative Mind by Hannah Greer

For my last blog post, I decided to throw out all ideas of a theme and simply post about a lot of ideas that have caught my eye lately. I would love to re-create all of these! Everyone has those random things that we are unnaturally drawn to. I, for instance, love the look of cupcakes and teapots. I am not by any means a “girlie-girl” but I love how some items can be so simple and yet so beautifully ornate. Now, how many times can you have cupcakes and teapots just sitting around as decoration in your house? Not very often. In this post, learn how to incorporate and re-purpose many pieces into something completely new that will leave you proud, and your guests envious.

Make a Teapot Lamp


How Alice in Wonderland is this? Granted the movie is a little weird, but what better way is there to incorporate that wonderful whimsical feel into your home. This way, rather than having unused teapots sit around taking us space or being tucked away in your kitchen cabinets, make them into something that is useful and always enjoyable! The process is a little long and complicated, but depending on the types of dishes that you get to go with your teapot pieces, there are a number of ways to stack your lamp together. To see all of the directions with pictures, go to http://vintagerevivals.blogspot.com/2010/10/crafting-with-starswinning-tutorial.html.

Make a Tray Table out of a Frame


I love how this tray has a cozy, country feel to it. If you have one of those huge foot stools in your living room instead of a table, you might appreciate how beneficial this tray could be! And if you have trouble keeping a table organized, this also might be just the thing your need. Not only does this look very easy to make, it also looks great in a living room. To see the step by step instructions, go to http://lemontreecreations.blogspot.com/2010/04/frame-tray.html.

Use an Old Window as a Picture Frame


If you don’t already have one of these antique windows, they can be found almost anywhere. If you can’t find an old one, new ones will do just as well, and with some sandpaper, you can distress the window until it looks vintage. I think that look is important in accomplishing this look. This window will be perfect for displaying a good amount of photos but not taking up and entire wall. The plus? You can hang it vertically or horizontally!

Personalize a Plate


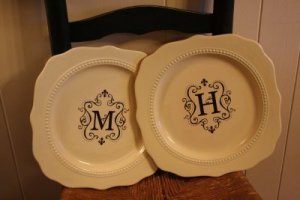
This plate was originally covered in a pattern, but was spray-painted and then personalized with modge podge and a napkin decoration! This is amazing to me, and of course I was drawn to it because I never see anything with H’s on them. I love the intricate decoration. These would be great gifts after a party. You could make everyone there own plate to use. You can’t even tell that this plate was once completely different. To see more on how this plate was made, you can go to http://www.320sycamoreblog.com/2009/04/monogram-plate.html.

Make a Mason Jar Oil Lamp


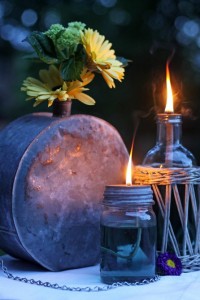
If you’re looking for the perfect outdoor or event lighting or event, look no further. If you want a romantic vibe, that is. You’ll need to a mason jar with a lid, lamp oil, and a cotton wick. After letting it sit for a little while, you’re oil lamp will be ready for lighting. To see some directions on how much oil you should use, how to position the wick, and also how to re-purpose a canteen, go to http://raisedincotton.typepad.com/raised_in_cotton/2009/06/repurposed-vintage-canteens-and-mason-jar-ideas.html.

 Make Your Own Cupcake Pin Cushion


With some fleece, stuffing and a ramekin, you can make your own pin cushion for all of your future sewing endeavors. For some help when making your cupcake, go to http://dollarstorecrafts.com/2011/01/cupcake-pin-cushions/.

For the past few months, I have enjoyed writing this blog for everyone so much. It has opened my eyes to how easy craft projects can be, and has inspired me to always look for ways to put personal touches back into my home. A big thank you to NCLAC for allowing me to create this blog and introduce it to everyone. We all get extremely busy, but we should never sacrifice the joy that we can receive by allowing ourselves to have A Creative Mind.

 Happy crafting everyone!

NCLAC is supported in part by a grant from the Louisiana Division of the Arts, Office of Cultural Development, Department of Culture, Recreation & Tourism, in cooperation with the Louisiana State Arts Council, Funding has also been provided by the National Endowment for the Arts, a Federal agency.

Sources:

www.pinterest.com

http://vintagerevivals.blogspot.com/2010/10/crafting-with-starswinning-tutorial.html

http://lemontreecreations.blogspot.com/2010/04/frame-tray.html

http://dollarstorecrafts.com/2011/01/cupcake-pin-cushions/

http://lemontreecreations.blogspot.com/2010/04/frame-tray.html

http://www.320sycamoreblog.com/2009/04/monogram-plate.html

http://raisedincotton.typepad.com/raised_in_cotton/2009/06/repurposed-vintage-canteens-and-mason-jar-ideas.html

A Creative Mind by Hannah Greer

Hello everyone and Happy 2012! Now that it’s the New Year you may be thinking, how could I have eaten that whole package of sweet Hawaiian rolls!? Why did I keep popping those Christmas m&ms? And how did I let my house become cluttered with piles of stuff. There is no better time than the beginning of the year to clean out, organize, and start your way on a healthy, relaxing path. If you’re looking for some easy ways to clean up your house and start the year off creatively, here are some easy projects to work on that can keep you inspired, organized, and in good health all year long. After making a fabric coffee sleeve this Christmas, I fell in love with the sewing machine and sewing projects. This year, let’s play with fabric!

Stylize Your Filing Cabinet

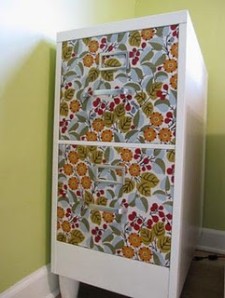
This idea almost makes me want to go buy a filing cabinet to decorate. With some sophisticated and/or pretty fabric, you can cover the front of your filing cabinet drawers. You can even paint the cabinet itself. If you don’t feel like using fabric, or if you can’t find a print that you want to use, you can also do the same thing with scrapbooking sheets. This may be a faster option. In my opinion though, while the scrapbooking paper will create the same effect, it will tear easily and it will not create the warmer more delicate look of fabric. To see how this cabinet was put together, go to http://wastenotwkshp.blogspot.com/2010/12/fabric-covered-filing-cabinet.html. There are many other examples of this all over the web.

Make Your Own Zipper Pouch

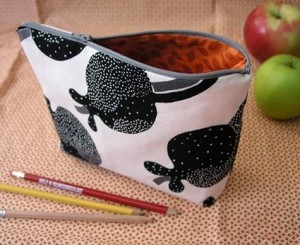
Who doesn’t need cute pouches? In the picture, this is used to hold office and/or school supplies, but you could use this for anything you need. Use it for holding makeup, coupons, jewelry, or as an overnight bag…anyone would love having a homemade bag. If you’re thinking,” I would never use this,” I’d be willing to bet someone in your life would. To see all of the directions, go to http://www.designsponge.com/2010/09/sewing-101-zippered-case.html.

Make A Key Ring

Ever have problems keeping up with your keys? I know plenty of people that do, myself included. Part of being organized means always knowing where everything is. Your keys might be the smallest thing you have to worry about, but we all know how panicked we can quickly become when you’re running late and suddenly they are nowhere to be found. A handmade key ring would be a good idea for everyone. Keep it by your door, or maybe take it to your office at work. To see how to make this paper flower key ring, go to http://www2.fiskars.com/Activities/Crafting/Project-Gallery/Guest-Designers/Mark-Montano/Paper-Flower-Key-Holder/.

Make Yourself a Rice Heat Therapy Bag

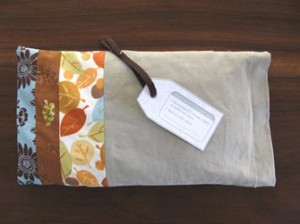
Everyone gets those aches and cramps that need attention. This year, make sure you take time to take care of yourself. I’m not sure why but this rice heat pad just seems so wonderful. Go to http://sewmamasew.com/blog2/2007/11/rice-heat-therapy-bag-tutorial/, to learn how to make this bag and to see the three items that went into the “Wellness Bag.”

Personalize Your Utensil Crock

Almost everyone has one of these utensil holders, but not everyone has one like this. After the holidays you may want a few recipes from your friends and family so that you can recreate a dish. Or you may just want to put a simple recipe for homemade cookies on your jar, like the one shown in the picture. Either way, this would make your kitchen much more personalized, and make your favorite recipe much easier to find! No more flipping through a recipe book! To see how to make one, go to http://cally-cruze.blogspot.com/2010/05/favorite-recipe-utensil-crock_20.html.

NCLAC is supported in part by a grant from the Louisiana Division of the Arts, Office of Cultural Development, Department of Culture, Recreation & Tourism, in cooperation with the Louisiana State Arts Council, Funding has also been provided by the National Endowment for the Arts, a Federal agency.

Sources:

www.pinterest.com

http://wastenotwkshp.blogspot.com/2010/12/fabric-covered-filing-cabinet.html

http://www.designsponge.com/2010/09/sewing-101-zippered-case.html

http://sewmamasew.com/blog2/2007/11/rice-heat-therapy-bag-tutorial/

http://howaboutorange.blogspot.com/2010/06/super-cute-sewing-tutorials.html

http://cally-cruze.blogspot.com/2010/05/favorite-recipe-utensil-crock_20.html

http://www2.fiskars.com/Activities/Crafting/Project-Gallery/Guest-Designers/Mark-Montano/Paper-Flower-Key-Holder/

A Creative Mind by Hannah Greer

Hopefully everyone had a wonderful Christmas and is now looking forward to the New Year! Whether you like to go to parties or stay in with the family, the New Year is something that everyone can look forward to. I have to admit that there’s still something magical about the celebration. Who knows what will happen! If you are throwing a party or even just want to decorate your house to bring the New Year spirit alive, here are some ideas of things to make, decorate with, and eat to make the end of the year special.

 Make your Mantle the Centerpiece

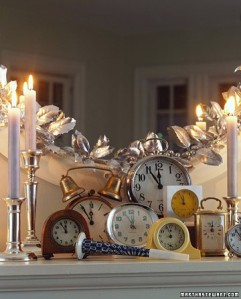
If there’s anything I’ve learned from working on this blog, it’s that decorating your mantle can transform the room, and make your house and the party your hosting much more festive. A lot of people struggle with decorating their mantles when it comes to combining different heights and sizes of your items. Sometimes, the simplest decorations are just enough, and are still beautiful. Multiple clocks of different designs are perfect for ringing in the New Year. This decorating idea is unique and people won’t be able to stop checking the clocks to see what time it is!

Decorate with Hanging Ornaments

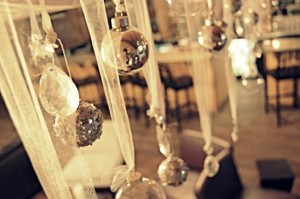
With some pretty ribbon you can hang some ornaments, some with glitter to add a sparkle, and some without, over your table, or anywhere else that they may fit in your house. New Year’s is nothing if not covered in sparkles and shine.

Cupcakes!

 I think one of my new favorite types of dessert is cupcakes. It seems like now you can find them at almost any party or event. Not to mention that decorating them has become an art on reality television. This would be easy for people to hold standing up and they’re easy to decorate. Here are two of my favorites.


These simple cupcakes are still elegant and pretty. Make the cupcake wrappers the most interesting part and add some clear sprinkles on top for some sparkle. You can buy these wrappers at http://www.dressmycupcake.com/shop/28-shop-by-holiday/129-new-years-cupcake-wrappers.html.

It only takes a few easy steps to make these “ball-drop cupcakes!” These are perfect for the New Year. Not everyone can be in New York for New Years in Times Square, but we can all have a little bit of New York in our homes. To see how to make these cupcakes go to, http://www.confessionsofacookbookqueen.com/2010/12/new-years-eve-ball-drop-cupcakes/.

 For the Kids…or Maybe for You :)


I remember confetti eggs from carnivals and celebrations but I hadn’t even thought about them in years! The kids will love these. At the countdown, set them loose with a hand full of eggs. If you’re worried about the mess, let them go outside. They are worth it, and it would make for some great pictures. To learn how to make them, go to http://radmegan.blogspot.com/2010/12/making-confetti-eggs-for-new-years.html.

Resolution Bracelet


Whether you buy one, make one for yourself, or offer up the supplies for the guests at your party to make one, these are a great idea. What better way to make yourself remember the promise you made to yourself at the beginning of the year. It can’t hurt, right? If you’re worried about it always standing out or clashing with your clothes, make it simple!

NCLAC is supported in part by a grant from the Louisiana Division of the Arts, Office of Cultural Development, Department of Culture, Recreation & Tourism, in cooperation with the Louisiana State Arts Council, Funding has also been provided by the National Endowment for the Arts, a Federal agency.

 Sources:

www.pinterest.com

http://www.confessionsofacookbookqueen.com/2010/12/new-years-eve-ball-drop-cupcakes/

http://radmegan.blogspot.com/2010/12/making-confetti-eggs-for-new-years.html

http://www.dressmycupcake.com/shop/28-shop-by-holiday/129-new-years-cupcake-wrappers.html

A Creative Mind by Hannah Greer

You mean Christmas is four days away!? With busy schedules, a list full of errands to run, and arranging the family’s holiday plans, anyone could feel like Christmas has snuck up on them. If you have family and friends coming over for the holidays, you might be thinking about what everyone will eat, watch, and do. If there are going to be lots of kids there, you may also be thinking, how can we keep them entertained? This year, have some Christmas activities prepared ahead of time! I love all of the holiday themed project ideas, all fast and simple!

 Jingle bell necklace

 Although these will make for a very noise-filled Christmas, kids will love these. The combination of beads and bells gives the kids to be creative and make their own stand out from everyone else’s. With varying sizes of bells, some Christmas colored beads, and red or green ribbon, the kids will be jingling all around the house.

Puzzle piece Snowflake Ornament

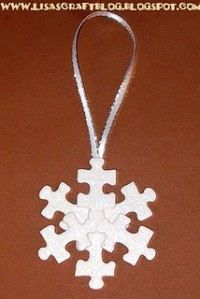
  My favorite ornament at our house is the glittery snowflake ornament. It has been since my childhood. Something else that makes our tree special is all of the hand-made ornaments from when my sister and I were little. This year, let the kids in your family make their own ornament. Painted white, and covered in glitter, these ornaments will add the extra sparkle to your tree and your kids will always remember that they made it themselves. Be sure to write the year on it to document how old he/she was at the time. For step-by step directions and a supplies list go to, http://lisascraftblog.blogspot.com/2011/12/tutorial-puzzle-piece-ornaments.html. You can also see a puzzle piece Christmas tree at this blog!

 Popsicle Art

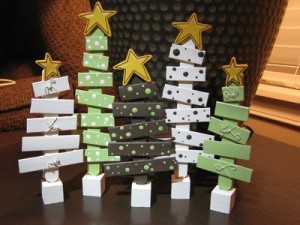
  Making things with popsicles is really easy and surprisingly there is a lot you can do with them. If your kids don’t want to make a big piece they can decorate on large stick as santa, a reindeer, or a snowman. There are some great ideas and pieces at http://somedaycrafts.blogspot.com/2009/12/popsicle-stick-crafts.html.

Santa's Key

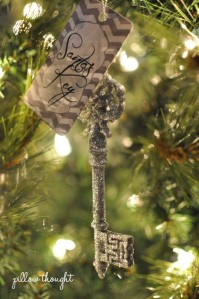
  Okay this might be my favorite. Everyone knows that Santa comes down the chimney. But what your house doesn’t have one. This poses a big problem and a lot of confusion for little kids. This year, with your kids, make a key to leave on your front door for Santa to get in.  Cover your key in glitter and string it with ribbon. Each year after this you can hang the key on your tree until Christmas Eve, when you’ll put it outside for Santa. Who knows, maybe Santa wants an easier way in even if you do have a chimney. For some more photos go to, http://pillowthought.blogspot.com/2011/12/thursdays-tip-santas-key-christmas-tip_07.html. I love the glittery red one!

Celebrate the Holidays with some sweet treats!

Santa Hat Brownies

  These are healthy right? Well I would at least feel a little better about eating a sugary snack if it had a piece of fruit on it. Smaller bite sizes would be perfect for everyone who just wants a little taste. For the list of ingredients and directions, go to http://www.catchingfireflies.com/blog/2011/12/santa-hat-brownies/.   For a sweet adult beverage you may want to try one of these two drinks.

Chocolate Peppermint Cookie Cocktail

This looks too sweet to pass up. Follow the link http://www.drinkoftheweek.com/drink-recipes/chocolate-peppermint-cookie/, for the mixing directions.

Santas Hat Cocktails

This drink sound different but delicious. I love the look of it too. So festive! Go to http://www.celebrations.com/content/santas-hat for mixing directions.

For some more Christmas food decorating inspiration, go to http://www.karaspartyideas.com/2010/12/gingerbread-party.html?utm_source=feedburner&utm_medium=feed&utm_campaign=Feed%3A+KarasPartyIdeas+%28kara%27s+party+ideas%29&utm_content=Google+Reader. See some North Pole cupcakes and table decorations!

NCLAC is supported in part by a grant from the Louisiana Division of the Arts, Office of Cultural Development, Department of Culture, Recreation & Tourism, in cooperation with the Louisiana State Arts Council, Funding has also been provided by the National Endowment for the Arts, a Federal agency.

Sources:

www.Pinterest.com

http://somedaycrafts.blogspot.com/2009/12/popsicle-stick-crafts.html

http://lisascraftblog.blogspot.com/2011/12/tutorial-puzzle-piece-ornaments.html

http://www.google.com/imgres?q=jingle+bell+necklace&um=1&hl=en&client=safari&sa=N&rls=en&biw=1436&bih=698&tbm=isch&tbnid=PWg7ezE7c8pF4M:&imgrefurl=http://www.orientaltrading.com/beaded-jingle-bell-necklace-craft-kit-a2-48_2739.fltr&docid=8OedxEDTV4t7eM&imgurl=http://s7.orientaltrading.com/is/image/OrientalTrading/48_2739c%253F%2524FULL_SIZE%2524&w=350&h=350&ei=SRTxTs6wFZKltwevj9XPBg&zoom=1

www.google.com

http://pillowthought.blogspot.com/2011/12/thursdays-tip-santas-key-christmas-tip_07.html

http://www.catchingfireflies.com/blog/2011/12/santa-hat-brownies/

http://www.drinkoftheweek.com/drink-recipes/chocolate-peppermint-cookie/

http://www.celebrations.com/content/santas-hat

A Creative Mind by Hannah Greer

With Christmas quickly approaching, I am getting more and more excited about being with my family and sitting by a warm fire. If you are having a lot of guests over this Christmas season, you may be trying to think of some last minute decorating ideas that can warm up your home, and of course, be cost-efficient. In my opinion, it is possible to decorate your whole house without making it look like Christmas threw a party, had one too many glitter-covered cocktails, and never cleaned up. With some simple ornaments, ribbon, and lights it’s easy to decorate your mantle, doors, and even furniture. Just like this…

Make Your Couch Festive


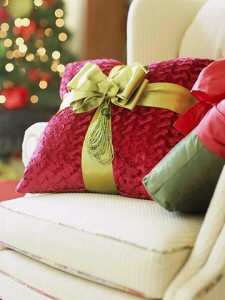
Wrap a pillow with ribbon to make it look a present! By adding a tassel in the front like they did here, it dresses up the look. This is simple but I love it. Who thinks of pillow presents?

 Make a Snowman to warm up the room!


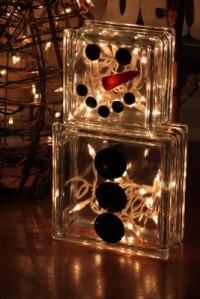
To make this, find glass blocks that have been pre-drilled. You can find these at Michaels or maybe even Lowes. With some orange construction paper, black vinyl, Modge Podge, and lights you can quickly make a glass block snowman to put in your entryway, outside your front door, or even right next to your Christmas tree.

 Wreaths Again!?


Oh, yes! Speaking of decorating your door...no one gets tired of wreaths. I mean  no one. Drinking lots of wine this Christmas? Or maybe so champagne to bring in the new year? Save your corks, find some festive red bells, and make a wreath for the inside of your house! To see all of the directions, go to http://www.goodhousekeeping.com/holidays/christmas-ideas/christmas-wreath-projects#slide-6.

If you love the felt flowers as much as I do then you’ll enjoy this wreath. These felt flowers are easy to make and the whole wreath has a very Dr. Seuss vibe. For directions on how to make these flowers and put the wreath together go to http://www.womansday.com/home/craft-ideas/Craft-How-to-Ring-of-Roses.

 Make your Mantle part of your Masterpiece

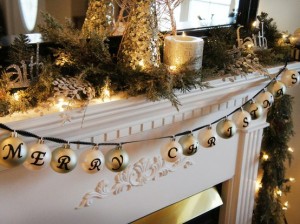
Apply some letter stickers onto some gold or white ornaments, or the color that would best match your room, to spell out the message of your choice. “Merry Christmas” always being a good choice. Loop the ornaments through a black ribbon and hang them from your mantle. This is simple, but very elegant. For some more photos of other beautiful mantle decorations, go to http://www.hgtv.com/decorating-basics/15-glowing-holiday-mantels/pictures/index.html.

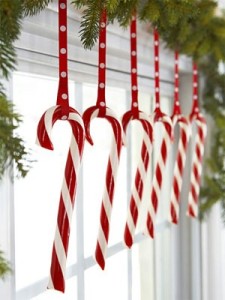
If you’re trying to add some festive color to your mantle, why not use candy canes? If you use real ones instead of fake ones, you can give one to each guest as they leave. Hang each candy cane individually from ribbon so that they will all hang evenly.

NCLAC is supported in part by a grant from the Louisiana Division of the Arts, Office of Cultural Development, Department of Culture, Recreation & Tourism, in cooperation with the Louisiana State Arts Council, Funding has also been provided by the National Endowment for the Arts, a Federal agency.

 Sources:

www.pinterest.com

http://www.bhg.com/christmas/indoor-decorating/fresh-christmas-decorating-ideas/?sssdmh=dm17.555963&esrc=nwxmascrafts2011_06_4&email=2503728077#page=20

http://fivewhites.blogspot.com/2009/12/glass-block-snowman.html

http://www.goodhousekeeping.com/holidays/christmas-ideas/christmas-wreath-projects#slide-6

http://www.womansday.com/home/craft-ideas/Craft-How-to-Ring-of-Roses

http://www.hgtv.com/decorating-basics/15-glowing-holiday-mantels/pictures/index.html

A Creative Mind by Hannah Greer

If you’re anything like me, you’re beginning to feel the pressure to find those special Christmas gifts for your family and friends. If you’re even more like me, you’re also feeling the stress of a tight wallet. This year, I’m looking more and more into DIY gifts that will be sentimental and yet usable all throughout the year. I have to admit, I’m loving some of the things I’m finding, and I’m beginning to think I need to make some these for myself!

 Personalize your gift-wrapping

By using brown paper, it is easy to decorate each package for the person you want to give them to. You can make the ribbons, pom-poms, or letters the centerpiece of the wrapping rather than the paper itself. I love the idea of putting initials, or stamping their name on the gift. Every year my family has a little bit of trouble finding the tags and remembering which presents belong to whom.  This makes each gift easier to find! The packaging’s simplicity is what I love about them. This wrapping cost efficient and meaningful. To see more photos and ideas, go to http://firefliesandjellybeans.blogspot.com/2011/09/10-easy-gift-wrap-ideas.html?utm_source=feedburner&utm_medium=feed&utm_campaign=Feed%3A+blogspot%2FXVSbu+%28Fireflies+and+Jellybeans%29.

 Make a Mouse pad

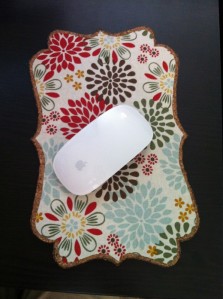
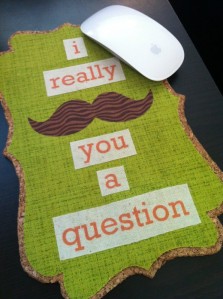
This is cheap and adorable! With some cork and fabric you can make a creatively shaped, double sided mouse pad. After you cut your shape, you only need to attach your fabric to the cork with an iron and “Ultra heat and bond.” For step-by-step directions and more photos, go to http://moderndaymoms.com/make-it-yourself-monday-cork-mousepad/.

Make A Snow Globe

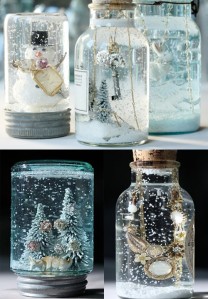
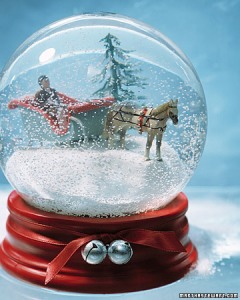
These are easy to make with a mason jar. With only a few materials, you can make your own Christmas snow globe or make them with your kids as gifts. All you need is distilled water, glitter, glycerin, clear drying epoxy, and a Christmas figurine. For tutorials and more pictures of homemade snow globes, you can go to either http://www.marthastewart.com/276346/how-to-make-a-snow-globe/@center/307034/christmas-workshop#/185992 or http://www.youtube.com/watch?v=iEQpwEHm6E8. I especially like the idea of tying a ribbon with bells around the jar for that magical jingle that is normally built in to snow globes.

If you’re looking to make some delicious treats as gifts this year, visit http://texascottage.blogspot.com/2011/11/10-christmas-gifts-in-jar.html?utm_source=feedburner&utm_medium=feed&utm_campaign=Feed%3A+TexasCottage+%28Texas+Cottage%29 for “10 Christmas gifts in a jar.”

For even more DIY gift ideas, go to http://danimariedesigns.blogspot.com/2011/10/2011-ultimate-diy-gift-guide.html.

NCLAC is supported in part by a grant from the Louisiana Division of the Arts, Office of Cultural Development, Department of Culture, Recreation & Tourism, in cooperation with the Louisiana State Arts Council, Funding has also been provided by the National Endowment for the Arts, a Federal agency.

 Sources:

www.pinterest.com

http://myblackbook.free.fr/?attachment_id=3817

http://www.marthastewart.com/276346/how-to-make-a-snow-globe/@center/307034/christmas-workshop#/200961

http://www.youtube.com/watch?v=iEQpwEHm6E8

http://danimariedesigns.blogspot.com/2011/10/2011-ultimate-diy-gift-guide.html

http://moderndaymoms.com/make-it-yourself-monday-cork-mousepad/

http://firefliesandjellybeans.blogspot.com/2011/09/10-easy-gift-wrap-ideas.html?utm_source=feedburner&utm_medium=feed&utm_campaign=Feed%3A+blogspot%2FXVSbu+%28Fireflies+and+Jellybeans%29

http://texascottage.blogspot.com/2011/11/10-christmas-gifts-in-jar.html?utm_source=feedburner&utm_medium=feed&utm_campaign=Feed%3A+TexasCottage+%28Texas+Cottage%29

A Creative Mind by Hannah Greer

Now that Christmas is on its way, these blog posts will be about decorating for the holidays! I’ve spent the last week, looking at lights, putting up trees, and making wreaths. I am feeling the inspiration and hope every one else gets in to the spirit as I post some of my favorite ideas for decorating everything from countertops to couch pillows. Nothing makes a house cozier than candles in every room. And with the cold winter weather, my first priority when I get home at the end of the day is to plug in my Christmas tree and light my favorite candles. Pumpkin spice…mmm.  Here are a few ideas of how to warm up your house for the holidays with lights and candles everywhere!

Cork Candleholder

 With two different sized glass jars and a whole lot of corks, you can make your own cork candleholder. Place your smaller glass jar, holding your candle, in the center of the larger and put your corks in the remaining space of your large container.

Snow Candleholder

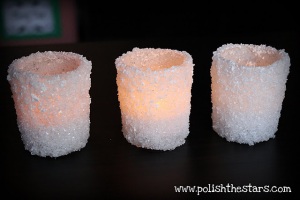
 I love this look! All you need to do is apply your modge podge onto your glass candleholder and sprinkle on some Epsom salt. The salt makes the glass holder look like a snowball. To see more pictures of the process go to http://www.polishthestars.com/2010/12/snowball-candles.html.

Glitter Candles

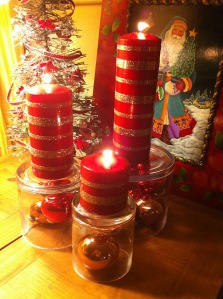
With a few different sized candles, you can put stripes of double sides tape around each one. Sprinkle your glitter on to the tape and brush the excess off with a brush. This is a great way to give your candles the sparkle that you want and change them from the same ‘ol same ‘ol. To see the step by step process and some other candle decorating ideas go to http://theivycottageblog.blogspot.com/2010/11/three-easy-candle-crafts.html.

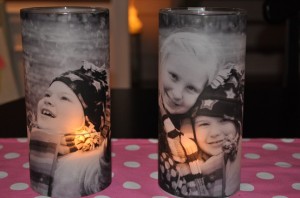
Pretty as a Picture candles

This Christmas, your family will warm the room with their presence. Surprise them by brightening the room with their pictures. This would be a great gift for others too, and a great way to incorporate 2 types of decorating, pictures and candles. The vases are covered with printed vellum pictures and held on with modge podge.

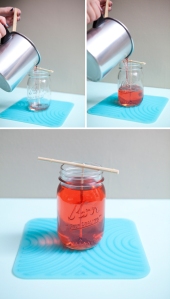
Make Your Own

Trying to decide on some homemade gifts for everyone this year. Candles are much more meaningful when you've made them yourself! For all the directions, starting from placing the wick to, making your wax the perfect consistency, go to http://somethingturquoise.com/2011/11/04/diy-poured-mason-jar-candle/.

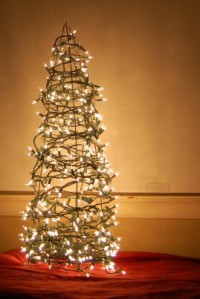
Tomato Cage Light

By turning a tomato cage upside down, it takes the shape of a tree. Cover it in a string of 100 lights and you’ve got the perfect dark corner or front porch decoration. This will be durable and very easy. Adding light is simple! Some of the most over-looked products can be transformed into something beautiful for your house.

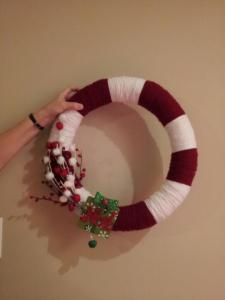
Here's just a couple of the wreaths that my family and i made over the Thanksgiving holiday. We hung them on a bedroom door and an office door! And yes, we did get our inspiration from Pinterest. :) Both were made with yarn.

NCLAC is supported in part by a grant from the Louisiana Division of the Arts, Office of Cultural Development, Department of Culture, Recreation & Tourism, in cooperation with the Louisiana State Arts Council, Funding has also been provided by the National Endowment for the Arts, a Federal agency.

 Sources:

www.pinterest.com

http://www.polishthestars.com/2010/12/snowball-candles.html

http://theivycottageblog.blogspot.com/2010/11/three-easy-candle-crafts.html

http://nedesignbuild.com/articles/?p=137

http://somethingturquoise.com/2011/11/04/diy-poured-mason-jar-candle/

A Creative Mind by Hannah Greer

With relatives, friends, and neighbors coming over for the holidays everyone wants their home to look comfortable and as put together as your Thanksgiving meal. Are your walls looking a little empty? These projects are perfect and easy for decorating your house. Some of them are interactive and would be perfect to keep your many family members entertained when they come to visit!

Make a Small Frame Message Board

For this project all you need is a piece of burlap, a frame, and a dry erase marker. After you frame your piece of burlap, you can write messages, quotes, reminders, or even your grocery list on the glass cover with your dry erase marker. To see some more pictures, go to http://www.jillruth.com/2011/08/table-runners-live-on.html.

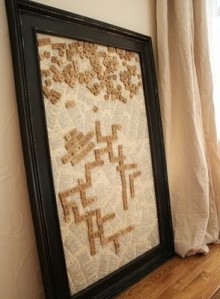
Make Your Own Magnetic Scrabble Board

You will need quite a few materials to make this board and a free day but your finished project will be priceless. Everyone has seen those black and white word refrigerator magnets. The funny thing about those normally boring little magnets is that guests love them! Even I catch myself playing with them, and minutes later, I have to make myself stop. Imagine how much fun could be had from a board with scrabble pieces. Whether you carry on a game continuous game of scrabble or use the board for messages and reminders, everyone will love this. So handy! To see all of the step by step directions with pictures, go to http://twiceremembered.blogspot.com/2010/01/make-your-own-magnet-board-make-your.html.

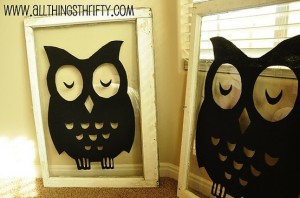
Paint a Picture on Framed Glass

These can be customized to match the design of any room in your house. These owl pictures would be perfect in a baby’s room.  After tracing the picture with a sharpie onto the back of the glass in your frame, fill in the rest of the picture with craft paint. To print your owl images, go to http://www.allthingsthrifty.com/2011/01/nursery-decorating-ideas-part-4-vintage.html.

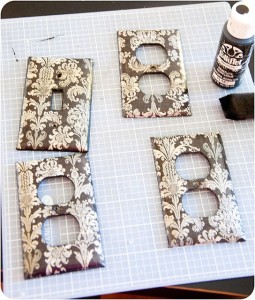
 Decorate Your Light Switches

This project is so simple but I love how it modernizes those old-looking light switches. Using scrapbook paper, some Modge Podge, a sponge brush, and an xacto knife. The options for decorating are endless! For step-by-step directions and more pictures, go to http://housewivesofriverton.blogspot.com/2011/10/covered-light-switch-outlet-plates.html.

 Make Origami Turkeys


If you’ll have a house full of kids this Thanksgiving, you may need another activity to keep them occupied. These origami turkeys are adorable and you can put them on your table for everyone to enjoy after the kids are done making them! All you need is brown construction paper, an orange and black sharpie, and some fake, colorful feathers. To see the photo tutorial, go to http://lets-explore.net/blog/2010/11/origami-turkeys/.

Looking for a new holiday recipe this Thanksgiving? In case you haven’t searched Pinterest for some inspiration, I chose the pumpkin pie milkshake to share. Rather than eat a ton of food, why not change things up and have a drink as a dessert? This is definitely different and if you like pumpkin pie, you can also go to http://luxefinds.com/Search-Results.php?&paginationSize=6&domainId=10&searchName=pumpkin%2520pie&focus=Blog&sort=Relevance&blogSearchPage=4 for this and a ton of other pumpkin related recipes!

 NCLAC is supported in part by a grant from the Louisiana Division of the Arts, Office of Cultural Development, Department of Culture, Recreation & Tourism, in cooperation with the Louisiana State Arts Council, Funding has also been provided by the National Endowment for the Arts, a Federal agency.

 Sources:

www.pinterest.com

http://lets-explore.net/blog/2010/11/origami-turkeys/

http://luxefinds.com/Search-Results.php?&paginationSize=6&domainId=10&searchName=pumpkin%2520pie&focus=Blog&sort=Relevance&blogSearchPage=4

http://www.jillruth.com/2011/08/table-runners-live-on.html

http://twiceremembered.blogspot.com/2010/01/make-your-own-magnet-board-make-your.html

http://www.allthingsthrifty.com/2011/01/nursery-decorating-ideas-part-4-vintage.html

http://housewivesofriverton.blogspot.com/2011/10/covered-light-switch-outlet-plates.html

A Creative Mind by Hannah Greer

Holiday season is in the air! I'll admit I’ve been dreaming of the holidays, and have listened to the Christmas channel on my Pandora account once or twice. Since my last couple of blog posts had a lot of fall themed ideas, and I still think it’s a little too early to bring out the Christmas decorations, I decided to focus more on some everyday simple projects that are not holiday themed.

This is probably one of the simplest ideas I’ve seen; yet I probably never would have thought of this. If you think the thermostat in your house is an eyesore. Dress it up! It’s shown here with a frame around the edges. You could find a frame that matches your style and spray paint it the perfect color. From an earlier blog, you could take the idea of painting a bird on the wall, making it perched on the thermostat.

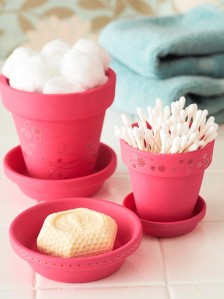
As much as I love shopping for home décor, the bathroom accessories always seem to fall a little short for me. Most of the options are in kid’s patterns or they all come in matching sets—shower curtain, linens, toothbrush holders, and soap dispensers. By making your own bathroom accessories, you can make them look exactly how you envision. Using flowerpots is a great idea for re-purposing an item too.

For all the kids out there! If your kids are messy eaters this idea is adorable. Growing up, I think I had Disney placemats, and mats with maps! I loved being able to pick out which one I wanted to use at mealtime. I had forgotten all about them though until I saw these. Easy to clean, and easy to store, these place mats will get your kids reading! Besides, Dr. Seuss books are great. Simply cut out two pages, lay them side by side and laminate them. You could take them somewhere to have them professionally laminated or use….

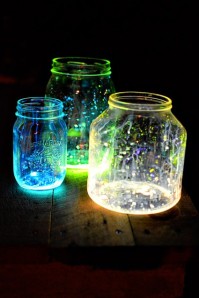
Looking for a way to make your place glow? These mason jars are perfect as nightlights, lining for a walkway, or simply decorating a table for a party. All you need are some glow sticks, scissors, and the jars themselves. Cut of the ends of the glow sticks and pour the liquid into the jars. Some small pieces of plastic or glass will come out of the sticks; be sure to pour those out of the jar and into the trash. Swirl the liquid from the glow sticks around in the jar. If you’re using the jars as nightlights in a kid’s room, you may want to put a lid on the jar. For more pictures go to http://www.intimateweddings.com/blog/diy-glow-jars-tutorial/.

At the Farmer’s Market this past weekend, NCLAC had all the materials kids needed to make their own bookmarks. I think some of the adults there might have enjoyed it even more than the kids though. These bookmarks are more detailed but I can’t help but smile when I see them. They remind of me a cartoon trying to eat my page. I like the thought of putting one on the corner of your page also. These are different and unique! For step-by-step directions, go to http://nheilke.com/blog/?p=2628.

This project may be one of my favorites. Now that it’s getting cold outside, for part of the day at least, I am craving some coffee. These coffee sleeves are adorable! This would be great because it is reusable, washable, and it shows off your personality much more than the brown, cardboard cup sleeve. I also love how they used a ponytail holder on it. I have tons of those! I’m feeling some inspiration for a handmade Christmas gift coming on. For directions on how to make this one, go to http://love-2-create.blogspot.com/2009/10/giveaway-2-coffee-cozy-starbucks.html. Another blog that is full of other sleeve designs is http://thecraftedsparrow.blogspot.com/2011/07/coffee-cozys-perfect-for-you-starbucks.html. I’m not sure exactly what all the craze is about with moustaches, but I have to admit, I really like it on these sleeves.

Since I’ve posted before about making wreaths, I didn’t want to add too much about another wreath design…until it gets closer to Christmas. J I just wanted to share this picture of one that I loved though, and the blog page full of many other ideas for all the wreath lovers. I think what I love the most about this one are the colors used.  To see the blog follow the link http://teachcraftlove.blogspot.com/search/label/Wreaths.

NCLAC is supported in part by a grant from the Louisiana Division of the Arts, Office of Cultural Development, Department of Culture, Recreation & Tourism, in cooperation with the Louisiana State Arts Council, Funding has also been provided by the National Endowment for the Arts, a Federal agency.

Sources:

http://www.dreamhomediy.com/2011/05/funk-afying-your-thermostats.html

http://www.bhg.com/decorating/storage/projects/diy-simple-storage-weekend-projects/?sssdmh=dm17.559566&esrc=nwdc110911a&email=3859392247#page=14

http://www.realsimple.com/new-uses-for-old-things/new-uses-kids/storybook-pages-kids-placemats-10000001189610/index.html

http://nheilke.com/blog/?p=2628

http://www.intimateweddings.com/blog/diy-glow-jars-tutorial/

http://teachcraftlove.blogspot.com/search/label/Wreaths

http://love-2-create.blogspot.com/2009/10/giveaway-2-coffee-cozy-starbucks.html

A Creative Mind by Hannah Greer

Cannot resist the Holiday decorations! Okay, I must. There are so many cute Christmas decorating ideas out there but I’m still looking forward to Thanksgiving! What do I think of when I think of this delicious holiday? First, what are we going to cook? Second, when is nap time? Third, what will we do when we’re not napping? Finally, how can we decorate to get in the spirit!? Centerpieces are a great way and simple way to warm up the house and make the table more interesting as everyone is gathered around. Since so much time is spent in the kitchen on Thanksgiving in my family, why not decorate the kitchen too? Make a Cake Stand out of Flower Pots

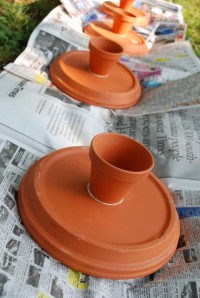
I love cake stands. They could be used for so much more than what they are made for. They also make great table centerpieces or counter decorations. You could paint your own stand to match your kitchen, a season, or a holiday party perfectly. For this, glue a small pot to the bottom of your pot base. Once it dries, spray the entire stand. For a stenciled effect, spray one layer of color over the whole thing first, then use a stencil to spray one designs. You can always paint your cake stand by hand of course.

 Make a Fall Hurricane Candle Vase

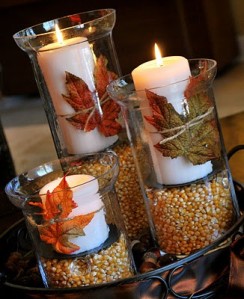
The maker of these vases used the entire set as a centerpiece for Thanksgiving. I love how she used only a few simple items to make a beautiful piece. For this project, any vase or glass will work. Fill the vase about halfway with corn. Place your candle on top and use twine to tie one or two artificial leaves around the candle for a pop of color! The candle will make the colors in the leaves glow. I can just smell the Thanksgiving food around the corner! To follow the My Heart’s Desire blog, go to http://www.myheartsdesireblog.com/.

Make a Felt Flower Centerpiece

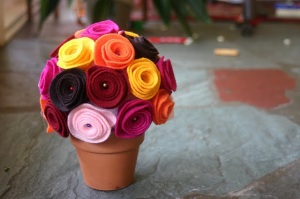
I am getting more and more drawn to these felt flower decorations. When you can put them on anything, pillows, wreaths, headbands, it’s hard not to take notice of this trend. For this project just get a small ceramic pot, a 4-inch Styrofoam ball, 25-30 sewing pins, seven sheets of felt, and a hot glue gun. Once you roll your felt in to flower shapes, place your hot glue on the base of the flowers and let it sit for 5 seconds or so, so you don’t melt your Styrofoam. Organize your flowers to fill up the foam ball but leave the base empty. Add a pin to the center of each flower for extra support and place your flower ball on to your flower pot. If you don’t want an orange pot standing out in your house, you could use the ideas from the cake stand, and paint your pot a different color. Inspiration! For more pictures of the process go to http://linesacrossmyface.blogspot.com/2011/09/fall-felt-flower-centerpiece.html.

Decorate your kitchen towel

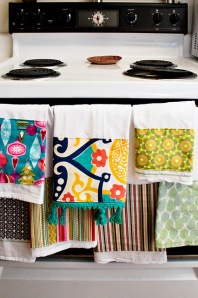
Everyone needs to have a cozy kitchen to go with that delicious Thanksgiving comfort food. Make your own decorative towels to brighten up your kitchen. You could even make your own seasonal napkins to put on your table for everyone on Thanksgiving Day! Since I am terrible at sewing, much worse at writing out the process, go to http://laurabrowe.blogspot.com/2010/09/sip-n-sew.html for directions on how to make these and more pictures!

Make some Wall Art

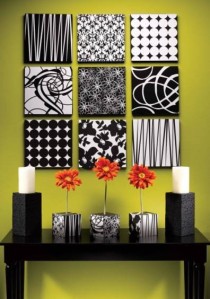
Granted this project idea is not holiday themed or even Fall related but I couldn’t resist sharing. All you need is…scrapbooking materials? With square sheets of foam, scrapbooking sheets, ribbon, glue, and wall hanger, you can change a space completely. What I like about this project is that it is an easy way to add patterns to a space, making it more interesting but without making it look overdone. I really like all of the possibilities and different variations with this too. For step-by-step directions, go to http://www.curbly.com/DIY-Maven/posts/3269-making-wall-art-out-of-styrofoam.

Okay, because I am writing this on the day of the LSU vs Alabama game I had to share this picture for those football lovers. Enjoy!

Chocolate covered football strawberries

NCLAC is supported in part by a grant from the Louisiana Division of the Arts, Office of Cultural Development, Department of Culture, Recreation & Tourism, in cooperation with the Louisiana State Arts Council, Funding has also been provided by the National Endowment for the Arts, a Federal agency.

Sources:

www.pinterest.com

http://www.myheartsdesireblog.com/

http://linesacrossmyface.blogspot.com/2011/09/fall-felt-flower-centerpiece.html

http://www.curbly.com/DIY-Maven/posts/3269-making-wall-art-out-of-styrofoam

http://laurabrowe.blogspot.com/2010/09/sip-n-sew.html

A Creative Mind by Hannah Greer

Now that Halloween is over I can’t stop myself from looking at 2 things: Food recipes for Thanksgiving, and tons and tons of Christmas decorations! I know I’m not the only one, though, as I’ve heard many people admitting they can finally listen to their Christmas music now without feeling judged. Since it’s not quite close enough to those holidays though, I’ll refrain from the holiday DIY projects for a little while and be content with beautiful lighting decorations. These would work not only for the holidays, but also for the changing seasons or even just for that dark hallway, entryway, corner, or table that you want to brighten up. All of these projects are so simple and of course, very affordable! Some may even include you heading outside to find your materials!

Seeing my mom struggle year after year with mantle decorations has left me laughing at many times, but searching for many different ideas that add height and light to the dark brick area. For this project, search the woods for tall, thin tree branches and limbs. Combine these with lighted branches that you buy in a skinny, metal bucket and instantly you have a great mantle decoration, centerpiece, or something for an empty corner in your house that needs to be livened up. For this and a ton more Fall project ideas, go to http://www.sugarpiefarmhouse.com/aunt-ruthies-autumn-home-tour.

Another way of using these lighted branches is to make a little bit of wall art. I really like how the piece was used in this picture over a table. For this project you’ll need about 2 packages of the lighted branches, canvas, a bundle of sticks, a bag of moss, green canvas paint, canvas molding paste, paste spatula, a paintbrush, E6000 glue, and a staple gun. To see all of the directions, go to http://www.craftwarehouse.com/index.php/component/content/article/21-home-decorating/568-canvas-with-lighted-branches

Want to make a creative candleholder? They’re referred to as rustic, and I can just see them fitting in perfectly in a cozy log cabin. Simply get a small, clear glass candleholder and glue twigs, found outside, around the edge. You could also use cinnamon sticks, rather than twigs, for the Christmas season. Want some more outdoor project ideas? Go to http://webecoist.com/2011/07/25/diy-decor-inspiration-14-eco-crafts-for-the-home/?ref=search.

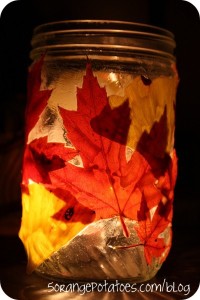
This candle jar looks so great! It would provide the perfect warm glow in my living room and radiate the Autumn! Search outside for those beautiful leaves that you can press. The brighter the colors, the better. After pressing the leaves for about 2 days, cover a side of your clear glass mason jar with Modge Podge and place a leaf on to it. After placing them on the jar, cover each leaf with the Mode Podge. After letting them dry, give the whole jar one last coat to seal the leaves. Place your candle inside of the jar, and light! So pretty. For more great ideas, organized by type of activity go to, http://www.5orangepotatoes.com/blog/2009/11/01/preserving-leaves/

This lampshade idea is romantic and elegant. I love the idea of being able to write poems, stories, song lyrics, or even a loving message on to your lamp shade and let the lamp cast the word’s shadows on the wall.

Ok, granted this isn’t a lighting idea but I love birds, and I really love houses decorated with vintage birds. This is just too adorable to not include. Seeing a little bird perched on my light switch every day would make me smile. It’s a great small touch.

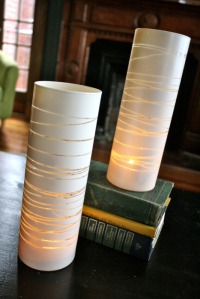
This candle holder, or vase, is so easy and looks like it would be fun and fast to make. Get a clear, tall glass vase. Place rubber band around it, forming the design that you want on the vase. Spray paint the whole vase covering the rubberbands. After you let the paint dry remove the rubber bands you should have very clear distinct lines! I really like the look of this light silver.

If you've tried any any of these projects or any other DIY project you uncovered we'd love to see the pictures! Send the pics to us at nclac5@gmail.com.

NCLAC is supported in part by a grant from the Louisiana Division of the Arts, Office of Cultural Development, Department of Culture, Recreation & Tourism, in cooperation with the Louisiana State Arts Council, Funding has also been provided by the National Endowment for the Arts, a Federal agency.

Sources:

Ideas and photos: www.pinterest.com

Instructions for projects:

http://www.sugarpiefarmhouse.com/aunt-ruthies-autumn-home-tour

http://www.craftwarehouse.com/index.php/component/content/article/21-home-decorating/568-canvas-with-lighted-branches

http://webecoist.com/2011/07/25/diy-decor-inspiration-14-eco-crafts-for-the-home/?ref=search

http://www.5orangepotatoes.com/blog/2009/11/01/preserving-leaves/

A Creative Mind by Hannah Greer

One of my newest, favorite hobbies now is scouring the website Pinterest.com looking for anything and everything. I’m talking decorating ideas, crafts projects to work on, food recipes, outfit ideas, or and even just for the humor. Pinterest.com is a website that allows users to post pictures of anything and everything that they like…keeping it clean of course. Users be warned, once you start visiting Pinterest, hours will fly by and addiction to the website will be your inevitable fate.  Recently, I’ve noticed a trend on the website and soon caught on. That’s why this week I wanted to bring the many ideas of decorating your door onto the NCLAC blog. Some ideas are holiday themed or seasonal. All of them look great though. Every time I see my house now, all I can think about are the many things I could make to liven up our front door. I love pretty wreaths!

Going back to the Halloween theme from last week’s blog. This spider web frame is cute and would be good as a subtle decoration in my opinion.  I think you could hang it outside or inside. I think they also look much better than the mossy spider webs that people buy in packages. The only materials needed are some yarn, tape, and you can re-purpose a frame. See the tutorial for this piece and other spider web decorations here http://www.dana-made-it.com/2011/10/tutorial-10-min-yarn-spider-web.html.

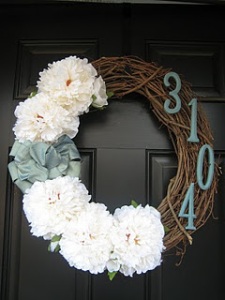
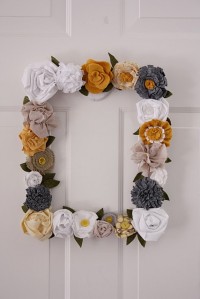
Another idea of something to make with a frame…They made felt flowers and simply glued them around the edge of the frame.  I love their white washed frame and the colors they used for the flowers. You can see their step by step process at http://deliacreates.blogspot.com/2011/03/scrappy-flower-spring-wreath.html. They also provide some tutorials for how to make those great felt flowers. You could put those one anything. I noticed many felt flowers, both big and small, on headbands and decorative pillows.

The makers of this wreath wrote that this wreath would look great throughout the Winter. I couldn’t agree more. The neutral colors work perfectly but the entire wreath still pops! The sparkle from the snowflake ornaments help a little bit with that too. The makers used a lot of hot glue, Christmas ornaments, burlap to cover their wreath frame, yarn, and jute. This project may take some time to wrap all of the ornaments in yarn but the finished product is worth it. Once your round ornaments, and wreath frame are wrapped, simply hot glue them down where you want them. You can even add some elements of nature the way they did. See the process step by step at http://twojunkchix.blogspot.com/2011/01/snowball-wreath.html.

This next decorative project is very inexpensive and easy. You can use foam tubing for the frame of the wreath, which you can find for under a dollar at Lowes. Cut the tubing to the size of the wreath that you want. Use a hot glue gun to attach coffee filters at their base to the foam tubing. I like that they used pretty ribbon at the top of the wreath. It makes it look much more formal. See where they hung theirs here http://www.thepennyparlor.com/2010/09/coffee-filter-wreath.html.

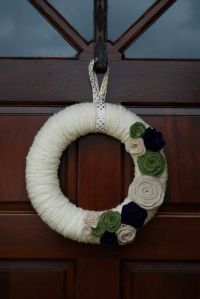
For this project, you can use the same type of foam tubing as the coffee filter wreath. Wrap the tubing in yarn and glue your handmade felt flowers on your wreath. I love the colors in this one but any colors would look great on a cream colored wreath. You can see more pictures at http://lydiascozycorner.com/2011/07/15/felt-yarn-wreaths/.

Here are a couple more tutorials on making other types of felt flowers:

http://mrspriss.com/2011/02/03/tutorial-felt-pom-pom-flower-thingamabobs/

http://snips-and-spice.blogspot.com/2011/01/felt-roses.html

If you’ve tried any DIY projects at your home, send your photos to us at nclac5@gmail.com. Tell us all about your project!

NCLAC is supported in part by a grant from the Louisiana Division of the Arts, Office of Cultural Development, Department of Culture, Recreation & Tourism, in cooperation with the Louisiana State Arts Council, Funding has also been provided by the National Endowment for the Arts, a Federal agency.

Resources:

Ideas found on Pinterest

Tutorials and photos found on websites given.

Wreath tutorial and felt flower sources: http://thirtyhandmadedays.com/2011/03/yarn-wreath-tutorial-from-angel-face-designs/

A Creative Mind by Hannah Greer

It’s almost time for Halloween! Like many people I am yearning for a good Halloween party--decorations, treats, and scary movies included. I’ve never been one for the super scary decorations though. Maybe that’s due to the many times was scared senseless when I was a kid by eager fathers hiding in bushes as I trick-or-treated. Nevertheless, I love ALL of the cute decorative decorations, which are usually sparkly, smiling, or multi-patterned. Things that make a Halloween party really great for me are all the homemade touches. And since I’m definitely no pumpkin carving connoisseur, I looked for many things that to make to decorate the house that are easy, eye catching, and maybe even a little sparkly. PLAYING WITH PUMPKINS


These pumpkin cans would be great for an outside walkway or on a windowsill. They’re pretty easy to make and would add that good small touch you may be looking for.

Materials:
Tin can
Clamp
Hammer and nail
Sandpaper
Metal primer
Acrylic paints: orange and black
Several yds of 18–20-gauge black annealed stovepipe wire
Tacky glue (we used Aleene’s Original)
Votive candle

Instructions:
Clamp can to table and poke holes for handle on opposite sides 1/2" below top with hammer and nail.

Sand, prime, then paint outside of can orange.
Pencil outline of a jack-o’-lantern face on front and punch holes along outlines. Paint face black. Let dry.

Wind 27" wire around a bunch of pencils or a thick dowel; remove and fasten ends in holes. Glue votive in place. When candle is lit, bend handle away so it doesn’t heat up.
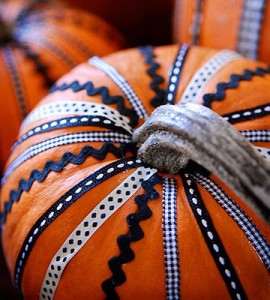
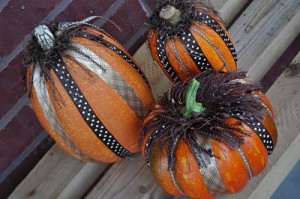
If you want to go with an easy route, simply buy some ribbon and decorate a pumpkin with that. This look is fast and easy, but adds a small touch that makes the pumpkin look a bit more unique without going all out.

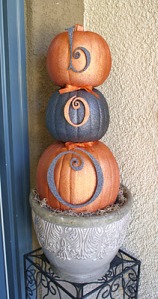
This is one of my favorites! And it would be a plus to be able to re-use this every year. You don’t need many materials, and the things that you will need to buy aren’t expensive. The person who made this pumpkin topiary bought her pumpkins on sale, the wooden letter and Krylon’s glitter blast all at Michaels. The colors they chose were “Orange Burst” and “Starry Night.” You simply need to cut a hole at the bottom of the top and middle pumpkin so that the top of pumpkin underneath can fit into it. Glue the pumpkins together and the wooden letters on to the face of the pumpkins.

DECORATING WITH BATS

I really like this lampshade idea. Not many people take the effort to decorate the lamps in their house but it adds to the mood of the party, it doesn’t take long to make or clean up, and this way your decorations are just out on display for people to look at, they’re hidden but your guests can still experience the addition. You can get the template for the bats at http://www.marthastewart.com/272505/shivering-bats-shade.

Directions:

Photocopy template to desired size; cut out. Using a white wax pencil, trace shape onto black construction paper; cut out. To suspend bats, make a ring from 20-gauge brass wire that fits just inside top of shade, resting on the shade spokes; a translucent white paper lampshade works best. Take a piece of white thread to bat; tie other end to ring. Repeat, hanging bats at varying heights and taping others to lampshade.

These bat streamers are just too incredibly easy to make I had to include them. I think they’re also a great way to decorate your mantle, or maybe a staircase. All you need is tissue paper, scissors, a pencil, and a cookie cutter in the shape of a bat. “Cutting the strings of shapes won't drive you batty, since the paper comes accordion-folded in its package. With black tissue paper you can craft bats, cats, rats, or witches; orange makes great pumpkins; and white is perfect for skulls and ghosts.”

“Trace or draw desired design across full width of a package of folded tissue paper; we used a cookie cutter as our guide. Cut along the outline, leaving a bit of uncut fold at both sides so figures connect to one another. You'll end up with several strings of five or six shapes each; tape together for a garland.”

MAKING DECORATIVE MICE

I’ll be the first to admit that I think mice are cute from a distance, but if I saw one running through my house I’d be that person that jumps on something high to get away from it. I love how these mice cutouts were used to decorate the stairs though. And these are also so easy. You can get the template for them at http://www.marthastewart.com/271198/paper-mice. Trace the template on black construction paper, cut them out, and tape them to your stairs and baseboards. I love them as small touches.

TRANSFORMING YOUR TABLE

I love this tablecloth, especially when paired with all of the paper lanterns. The bright colors and different patterns really caught my eye. If I saw this set-up at a party I would have to walk over right away to see what treats were being served.

What you need: Crepe paper: black (11208-2006), bright orange (11208-4516), and white (11208-1006) $1.07, from dickblick.com
Streamers: black (11208-2001), bright orange (11208-4511), and goldenrod (11208-4191) $3.59 per 500 feet, from dickblick.com

How-To:

1. Alternate layers of orange, black, and white table crepe paper.

2. Then, punch various size holes from streamers. Use punched circles to decorate top layer.

3. Cut scalloped edge from black streamer and use it to trim top of table.

FOOD

These Caramel marshmallows sound like they would be so rich, but oh so yummy. Simply dip a large marshmallow on a stick in to melted caramel, let it dry, and then dip it into melted chocolate. Let it completely dry and cool before eating.
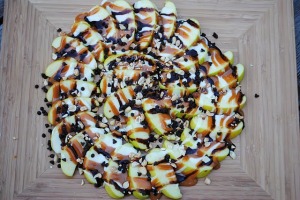

These Apple Nachos look delicious! And hey, at least you’re eating fruit!

WHAT YOU NEED:

4 large Granny Smith apples, sliced

35 large marshmallows

1/4 cup butter

35 caramels

1 Tbsp evaporated milk (or half and half)

1/4 cup peanuts

1/4 cup mini semi-sweet morsels

2 Tbsp chocolate syrup

DIRECTIONS:

Slice apples and arrange on platter.

In saucepan, melt marshmallows and butter until creamy. Set aside.

In microwave dish, melt caramels with milk (cooking in 30 second intervals, and stirring). Set aside.

Pour marshmallow cream over apple slices, followed by caramel sauce. Drizzle chocolate syrup and sprinkle with peanuts and mini chocolate morsels. Serve immediately and enjoy!

Ok so you want to have other food that’s not covered in chocolate and marshmallows at your party? Shape your veggies in a festive way to decorate your table. This platter has carrots, broccoli, and cucumber slices with dip!

DRINK

Ok, as a s’mores lover my jaw dropped when I saw the picture of this drink. I have no idea if it would be good or not but I can’t help but want to try one. Here’s the recipe.

S’mores Martini

2 Ounces Chocolate Vodka

2 Ounces Bailey’s Irish Cream

2 Ounces Cream de Cacao

2 Ounces Vanilla Vodka

2 Ounces Heavy Cream

Graham Crackers, Crushed

Chocolate Syrup

12 toasted mini marshmallows or 4 large marshmallows

Dip the rim of 4 martini glasses in the chocolate syrup and then into the crushed graham crackers. Chill glasses in the freezer. Pour all the remaining ingredients except the marshmallows into a martini shaker filled with ice and shake until well blended. Skewer your marshmallows on a cocktail stick and place in the chilled glasses. Strain the drinks into the 4 glasses. Enjoy!
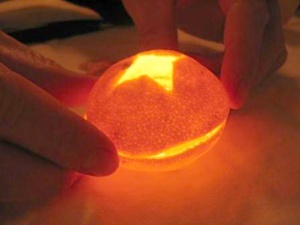
Since the process for this project is better shown with pictures, I chose not to write it all out directions, but if you want to learn how to turn a Clementine into a candle follow this link, http://www.apartmenttherapy.com/ny/how-to/how-to-make-a-clementine-candle-001453, and click “Enter Slideshow.” There is a step by step process with pictures showing how to make one. I think this is amazing and the finished product is beautiful! Very unique.

For some great ideas of decorating your pumpkins in a different way follow this link, http://www.bhg.com/halloween/pumpkin-decorating/pumpkin-decorating-ideas/?rb=Y&7781#page=1,  to the Better Homes and Gardens website.

For more ideas and crafts projects, www.marthastewart.com has more Halloween templates that you can cut out and a homemade decorating idea for every inch on your house.

Sources:

Paper mice Idea and photo- http://www.marthastewart.com/271198/paper-mice

Halloween tablecloth idea and photo- http://www.marthastewart.com/264440/halloween-tablecloth

Bat garland idea and photos- http://www.marthastewart.com/273027/bat-tissue-paper-garland

Bat lampshade idea and photos- http://www.marthastewart.com/272505/shivering-bats-shade

Clementine candle idea and photo- http://www.apartmenttherapy.com/ny/how-to/how-to-make-a-clementine-candle-001453

Pumpkin ribbon photos- http://www.thehighheeledhostess.com/ and http://pinterest.com/pin/334659320/

Smores martini recipe and photo- http://www.mydailyfind.com/tag/smores-martini-recipe

Pumpkin veggie platter photo- http://pinterest.com/pin/242142264/

Glitter pumpkins ideas and photos- http://adiamondinthestuff.blogspot.com/2011/10/glitter-pumpkin-topiary.html

Marshamallow treats recipe and photo-

http://www.aturtleslifeforme.com/2011/04/caramel-marshmallows-oh-my.html

Pumpkin cans idea, directions and photo- http://www.womansday.com/Articles/Home/Crafts/Pumpkin-Lantern.html

Apple nacho recipe and photos- http://www.shugarysweets.com/2011/06/apple-nachos.html

NCLAC is supported in part by a grant from the Louisiana Division of the Arts, Office of Cultural Development, Department of Culture, Recreation & Tourism, in cooperation with the Louisiana State Arts Council, Funding has also been provided by the National Endowment for the Arts, a Federal agency.

A Creative Mind by Hannah Greer

This past Monday and Tuesday, I had the pleasure of meeting the band Bearfoot, which came to Ruston on a three-day residency. Bearfoot is a blue grass band originally from Alaska. Now, however, they tour across the country. On Monday, the band gave Tech students a witty presentation about “How to Market yourself as a band.” The presentation included a performance of their song, “Before You Go,” a deeper look into the business side of the music industry, their personal experiences, and a sneak peek of their brand new music video for their song, “Tell Me a Story.” Beginning when they were only teenagers, only two of the founding band members remain. They got their start by performing at festivals and being sponsored by a local fisherman’s market. In 2001, they generated their “first real resume builder,” according to band member, Angelo Oudean, when they won the Telluride Band Contest. Both the Dixie Chicks and Nickel Creek have won this contest in the past. Years ago, Bearfoot offered camps for kids to learn more about Bluegrass and how to play this type of music. According to the band’s members, the best way to learn Bluegrass is to listen to it and practice it, not to read sheet music. Today, the band no longer offers camps, but they focus on “music in the schools.” Bearfoot gave students useful advice and tips. They talked about how a good band functions together as a team, finding a niche market, how to reach out to your fans, and many of the financial aspects of being a musician. They even gave advice about the best places to spend and save money, and how to best keep track of your all of your social media sites and networking tasks. Their advice to students was both entertaining and beneficial.

Last night, their concert took place at the Dixie Center for the Arts. The event was sponsored by “Divine Wine and Spirits” and wine was made available to the guests at intermission. They sang songs from both their old records and newly released album, “American Story.” During the performance, each band member had the opportunity to sing. Many of them changed instruments throughout the show, from the bass to the bass guitar, and the mandolin to the fiddle. They even had an a cappella song in their lineup which sounded great with all five band members standing around one “omni-directional” microphone. They even sang “Tell Me a Story,” which is now one of my new favorite songs! As promoted by the band, anyone who joins their email list will receive a free download of one of their songs.

Today, the band will be giving a school performance q/a at the Dixie Center for the Arts. I personally want to say Thank You to all of the band members for coming to Ruston. I loved seeing your presentation and performance, and hope to see you back here soon! Also, a big Thanks from me to the Louisiana Tech Music Department for all of their help arranging the band presentation and the Dixie Center for the Arts for hosting the concert.

To learn more about Bearfoot and support them, you can find their Facebook page under the name “Bearfoot Fan Page,” or on their website, www.bearfootband.com.”

Here are a few pictures from Bearfoot’s on-campus presentation and concert!

[gallery]

Also, ArtOberfest is tomorrow! It starts at 5. I can’t wait to see everyone there!

NCLAC is supported in part by a grant from the Louisiana Division of the Arts, Office of Cultural Development, Department of Culture, Recreation & Tourism, in cooperation with the Louisiana State Arts Council, Funding has also been provided by the National Endowment for the Arts, a Federal agency.

A Creative Mind by Hannah Greer

It’s that time of year again. The Red River Revel is in Shreveport! The Revel is an annual festival with great food, a ton of artist booths, live band performances every day, and an abundance of kids activities. On Saturday, I spent six hours walking around, eating, and listening to their main event of the day, Better Than Ezra. Three of those band members, in fact, are from Shreveport and Monroe. If you have never had the opportunity to experience all of the fun of the Revel, trust me, you definitely need to make the day trip! You can see, and buy everything from bonsai trees, soap and candles, and wooden art, to pottery, jewelry, photographs, and canvas paintings. And for the hunter in your life, you can find hand carved duck calls and knives. Worried about your kids getting bored? Problem solved! At the Revel, there is an entirely separate children’s section that has activities such as book readings, sand art, clay pot painting, face painting, paper hat construction, and a mock dig for crystals. And these are just the hands on activities! There is also a Ferris wheel, bungee cords, and a rock wall set up for everyone. This year, there were many familiar artist faces but also some new ones. All of the artists have wonderful displays of work, but there were a few booths that stuck out to me the most. Brian Miller is a photographer from Baton Rouge. Some of my favorite pieces of his, which are printed on canvas, are his Panoramics. They’re big, bright, and attention grabbing. The pictures draw you in, and I can see one picture in particular being perfect right above my couch. J You can see more of his work at www.briankmiller.com.

The art of “Louisiana Silent Echoes” includes photographs of angels with inspiring phrases. The artist ties to two together very well, sometimes mounting the pictures on stone. These look really great in a patio setting. I also really liked the way the photos were altered, adding bright colors. These changes sometimes altered the whole mood of the piece. I think everyone, especially those who love statue art, can enjoy these pieces. See them at http://www.silent-echoes.com/servlet/StoreFront.

Candice Alexander has become really popular in the area, as well as around the globe. At every event, there is always a huge crowd of people around her tent, eager to see what’s new. I first saw her work a couple of years ago, and I still love the creativity and colors that she uses in her Fleur de Lis paintings. Each piece is really unique, and can match perfectly with someone’s personality or the season. See all of her work at www.candicealexander.com.

One new booth that I loved was “BedFord Falls Headwear” from New Orleans. Along with their jewelry, which won me over from the start, they make headbands, hair pieces, and fascinators, big and small, that are creative and definitely unique! I loved the fact that they looked very vintage. I think I spent about twenty minutes picking up and trying things on. Everything was just so cute, and beautifully put together. I wanted way too many of them. Not many people could resist taking a peek at themselves with one on. Take a look for yourself at http://bedfordfallsheadwear.bigcartel.com/.

I hope that everyone gets the chance to go to the Festival Plaza in Shreveport, eat a slice of Muffaletta pizza, or maybe chocolate dipped cheesecake, and meet the artists. They'll be there through this Saturday, October 8th. To find more information about the Red River Revel, or see their list of food booths and schedule of live bands and performances visit http://www.redriverrevel.com/.  Here are some pictures of my Saturday at the Revel. If you get the chance to go, send us the pics of your fun-filled day to nclac5@gmail.com or hgreer20@yahoo.com, and tell us about your favorite parts of the festival.

[gallery]

A Creative Mind by Hannah Greer

So, a fact about me: I love small touches-in, or on a house, especially things that are homemade. Wreathes, Frames, re-finished furniture, paintings, lamps, pottery, etc. While some people love the very classic, modern, and put together look, I can’t help but yearn for those personal touches. Making something with your kids, as a gift, or even for yourself will become a sentimental item. I’m happier when I’m surrounded by the things that I, or others have created. Here are just a few ideas of some smaller decorative items that you can make to use around your home or make as a gift.

Make an Accent Light out of a Wine Bottle:

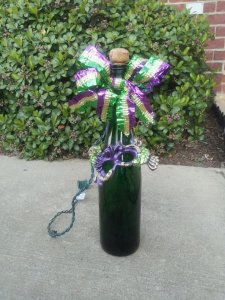
After seeing these at a crafts and artist’s exhibition a couple of years ago, my mom made one for me and I still love it! Mine is Mardi Gras themed but it is so easy to make one that fits your personality or matches a room in your home. Use a washed, opaque glass bottle, it can be clear or even a color like green or blue. If the bottle is too dark, the lights will not shine through as well. Put the lights in the bottle. I like to get a string of 100 lights at Hobby Lobby; they are usually only a couple of dollars.  Make sure you leave out enough of the strand out of the top of the bottle so that it can reach the plug you are going to use without pulling the bottle. Apply the cork back into the bottle. If you’d like, you can use a little bit of super glue to make sure it doesn’t slip out, however, because the strand is also in there, the cork should be snug. Decorate the outside of the bottle with ribbons, ornaments, glitter, anything! The Mardi Gras mask on this one is actually a Christmas tree ornament strung over the top of the bottle. These make great night-lights for kids, or even for a kitchen. They provide the perfect warm glow to the room.

Here’s my Mardi-Gras light!

Make A Personalized Cookbook for Someone you know:

Include family recipes, hand-written and typed, as well as pictures, and scrap-booking pieces. My family made one for me a few years ago, and it is incredibly sentimental to me. It’s also much more unique because of all of the decorative additions. As you get older, you can add dishes that your family makes on holidays. You can also add pictures of someone eating the dish the first time it was made, or a picture of the chef with their dish. This turns your average cookbook in to a scrapbook, making it not only interesting to people who like to cook but also to people who like looking through a creative set of family photos. Get multiple family members to add recipes to the book. Or add recipes for dishes that that person loves. My book was purchased but the inside is full of family-decorated sheets. It has drink, meal, and dessert recipes.

Here are a few photos of what mine looks like…

Assemble a Chandelier Candleholder:

Okay, when I first saw this online I fell in love. In fact, I think my exact words were, “Awww.” Granted, it’s a little bit more “glam” but I think it would be great for an outdoor patio or back porch, or even as a decoration for a party. Once again, it’s so easy to make! Find a wire basket with a flat bottom that you will be able to hang. You can most likely find a basket like this at a thrift store, or even Lowe’s or WalMart. Look for the kind that is used to hold outdoor potted plants. Attach your crystals to the top and bottom of the basket, including some strands. Hang your chandelier using a chain. Put your medium sized candles into glass mason jars and onto your chandelier and voila! Your chandelier is finished.

"A house is not a home unless it contains food and fire for the mind as well as the body." – Benjamin Franklin

 If you’ve done any of these decorative projects, we’d love to see! Send in your photos to nclac5@gmail.com or hgreer20@yahoo.com.

Sources: Chandelier idea and photo:

http://www.sunset.com/home/weekend-projects/make-an-outdoor-chandelier-00400000011789/

A Creative Mind by Hannah Greer

Are you eager to get out of the house and find new things to do? Me too! That’s why this week I decided to search the Shreveport, Ruston, and Monroe areas for some great local businesses where everyone can be creative, artistic, and expressive. At these shops, studios, and theaters, you can be part of the process or sit back and enjoy the show. All you need to do is decide what you’re in the mood for! If you’re in the mood for…

Painting:

Painting with a Twist provides both private and public classes. While working on your masterpiece, you can sit back and enjoy a glass of wine with your friends or family. The art pieces are chosen in advance but visitors can put their own creative twist on pieces that will make it unique to them. Painting with a twist has a ton of options to choose from! I love their variety. It was pretty hard for me to choose which painting I wanted to do for my sister and which ones I would want to do for myself. Best of all, they have locations stretching across north Louisiana. Check out their website, http://www.paintingwithatwist.com/ to find a location and see their calendar of events!

Arts on Fire located in Shreveport, La is a paint your own pottery business. They offer the wide range of pieces, decorative stencils, and stamps to choose from and all you need to bring is your imagination to transform them however you choose. You could make your own plate, a bowl for your pet, and so much more. Once you are done, you leave your piece to be fired and it will be ready to go home with you in 7-10 business days. Parties are also possible if requested. Having taken a pottery class in the past, I have a great appreciation for those artists that create the pieces from a simple pile of clay. Many people would be surprised at just how difficult it can be and how much technique the trade requires. That is one of the reasons why I love businesses like these. You skip all of the difficult parts of the pottery process, and get to enjoy the decorating process, making the piece your own. See the Arts on Fire website, http://www.artsonfire.com/ to learn more about all of the pieces you can paint to decorate your home with and to find coupons for your next visit!

Sewing;

 Stitchville is a local business that I stumbled upon one day when I went to buy some class supplies in Fine Line Art Supply and Print Lab, where they share a space. I think I fell in love as soon as I saw their set up. After looking at their website, I can’t wait to find a reason to go! Stitchville offers parties and classes as basic as “Learning to Sew” to “Making your own Clothes.” The most I have ever been able to do when it comes to sewing is stitch a tear in fabric or replace a button but I can’t help but be excited about the idea of learning to make some of the things that Allie Bennett, Stitchville owner, offers under their class schedule. Projects like these would make great gifts too! See more on their website http://www.repursables.com/Home.html.


Dancing:

 Linda Lavender’s School of Dance and Debbie’s School of Dance are located in Monroe, LA and West Monroe, LA.  Both dance schools offer classes for children and adults. Art isn’t just about making things with your hands. Dancing is a very artistic way of expressing something about yourself. Visiting a dance school could be a good way to learn a new skill, add a new type of exercise into your life, and gain more strength and coordination. (Something that I could definitely use more of at times!) Although I’ve never taken dance classes before, it has always been something that I’ve been interested in and I was thrilled to see that schools like these are available so close to home! Learn more about Linda Lavender’s School of dance at http://www.lindalavenderschoolofdance.com. See the website for Debbie’s School of Dance here: http://www.dbourgdance.com/index.html.

The Theater:

 Most of you may know about the Dixie Center for the Arts. What I love about the Dixie is it’s ornate theater feel and I love how they work to enrich the community. As a local theater, they bring to, and provide a space for entertainment in Ruston, LA. They also support local artists by supporting NCLAC's Piney Hills Gallery in their lobby by providing a space for artist’s arts and crafts. Support the Dixie by stopping by their lobby, get season tickets, or keep up with their schedule of events at http://www.dixiecenter.org/Home.php.

The Strand Theatre in Shreveport, LA is one that I have fond memories of, and it is still one of my favorite places to go. They offer everything from bubble shows to classic musicals to ballets. The shows provided are great for children and adults. The Strand is a beautiful landmark of Shreveport, and it is one that I would recommend for everyone to experience at least once. After all, the experience is half of the treat of going. Choose which shows you want to see at the Strand at http://www.thestrandtheatre.com/index.php.

If you or anyone you know have gone to any of these businesses or plan on going in the future, send us photos of your creations and experiences and tell us about your time there!

Supported in part by a grant from the Louisiana Division of the Arts, Office of Cultural Development, Department of Culture, Recreation & Tourism, in cooperation with the Louisiana State Arts Council, Funding has also been provided by the National Endowment for the Arts, a Federal agency.
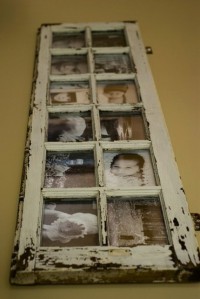
A Creative Mind by Hannah Greer

A Creative Mind is an ongoing post by NCLAC's fall intern Hannah Greer.  A week ago, I got to experience the exciting and exhausting task of moving in to a rental home with two friends. We were crowded, stressed, and completely thrilled! Over the weekend I spent Saturday helping one of my roommates figure out exactly what and where to hang her FOUR boxes of frames and wall decorations around the house. And when I say wall decorations, I mean more frames. It’s easy to say that she has an addiction…to thrift store finds. I was amazed at how many cute things she had, including vintage picture frames, clocks, and candlestick holders; all ranging from about seventy-five cents to ten dollars at most. We hung up, took down, and re-centered the wall art for most of the afternoon and it got me thinking about how difficult it is for some people to decorate their homes. Being a college student means having to work with hand me down furniture and limited funds but with the right pieces and ideas, anyone, even a college student, can have a comfortable and creatively designed place to come home to, all for only a few dollars.

One of the things that many college students often live without is a bed frame. About two-thirds of people that I know have had to do this, myself included. When you’re moving from one place to the next every year, no one wants to have to carry the extra weight of a frame when a mattress and box springs will do just fine right?The  headboard on your bed however, can add a lot of character to your room. It may offer a way to tie the room together or even provide some extra storage space depending on what you use. Here are two inexpensive and easy headboard ideas that I love.

Create a Headboard With a Curtain Panel

Above your bed, center and hang a curtain rod on which to hang your curtain panel. On your curtain panel, use fabric markers of different thickness or even colors to write your favorite quotes, poems, or lyrics. You can even have friends and family write something meaningful on the panel.

Create a Headboard Using Photo Frames

Like my roommate, you can find inexpensive frames at thrift stores, garage sales, or even craft stores. Choose a fabric that will match your rooms design. Remove the glass from the frames and cut batting the same size as the frame back. Cut your fabric to size, adding 3 inches on each side. Lay the batting on the frame back and cover it with the fabric, wrapping the excess over the back. Pull taut and fasten it down with duct tape. Insert the back into the frame. Depending on the size of your bed, place two or tree of the frames side by side along the back of your bed.

Something that my roommates and I struggled with was finding other ways to decorate the blank walls in our living room. This next idea was one that I think is great for everyone, especially college students.

Turn Your Old CD Cases into Frames

Unless you’ve already purged them for the sake of de-cluttering, everyone has those old CD cases tucked away somewhere that we used to love but no longer have any use for.  These clear CD cases are the perfect size to create a pattern on a spare wall in your home, whether it’s over a desk or an entry-way table. Discard the plastic inserts in the cases and find a collection of photos that you’ll want to use. It can be landscape photos, or even a series of patterns. Scan or crop your images to the size of a CD case (5 3/8 in. wide by 4 5/8 in. high) then print on good photopaper and trim. Standard cases will work much better than slim cases. Back each photo with cardboard or foam board and snap the cases shut. Attach them to the wall using Velcro squares that will stick to the wall.

Another simple idea to fill a big empty wall space or even make a work area more creative is to hang your empty frames in an organized cluster. If you love vintage furniture as much as I do, you’ll love searching for your pieces and the finished product in this project.

Create Frame Art

Again, you can find frames at thrift shops, garage sales, or maybe online. If you see a great piece out at the curb don’t be afraid to pick it up, clean it off, and make it part of your collection. Another great way to create a vintage feel is to use a combination if different colored frames. This will also help brighten up the area and make it more interesting for others to look at. Framed mirrors may add more intrigue, or you can fill your frames with fabric to add more patterns to the space. Use frames that are different sizes and textures to make the space unique. Above all, make the space represent you and your taste.

“Art consists of limitation. The most beautiful part of every picture is the frame.”-G.K. Chesterton. - Writer

If you or anyone you know have done any of these or past project ideas we’d love to see them! Submit photos of your finished project to hgreer20@yahoo.com or nclac5@gmail.com and tell us what you thought!

Sources:

Headboard photos and Ideas - http://www.bhg.com/rooms/bedroom/headboard/cheap-chic-headboard-projects/#page=3 and http://www.bhg.com/rooms/bedroom/headboard/cheap-chic-headboard-projects/#page=13

Frame Art Photo – vintagerevivals.blogspot.com

CD photo cases photo and Idea – http://www.sunset.com/home/weekend-projects/diy-decorating-projects-00400000064329/page18.html

A Creative Mind by Hannah Greer

Hi all! As an art lover, I am fond of all things unique. Working on a creative project can open a mind, act as a source of therapy, and brighten even the dullest spaces. “A Creative Mind” is a blog for those who love being creative and artistic but are stumped when it comes to deciding what they want to work on. For this blog I scoured the Internet, magazine articles, and my own experiences for artistic projects and ideas for kids, adults, and families. These may include decorating your home and yard, gift and event ideas, or sometimes ideas that will simply help you pass the time while being spontaneous and creative. Readers will also get information about local businesses and events that they can visit in order to be surrounded by the trifecta: great food, great music, and of course, great art. Like NCLAC, this blog is meant to help enrich lives with artistic expression and create a culturally exciting community. In celebration of the changing weather I wanted to share some ideas for fun and creative projects involving the outdoors. These projects can be a good source of entertainment for kids, or a fun way to spend your time and decorate your yard.
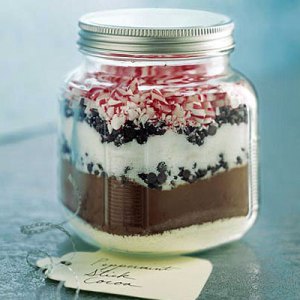
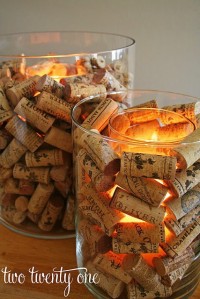
Make A Nature Collage

Things you’ll need:

Poster board or Cardboard

A camera to take pictures and your printed photos

Flowers, leaves, twigs

Glue

Go on a walk and take pictures of the trees and flowers around you. You can give your collage a theme such as “Beach,” “Autumn,” or “Spring.” Or use the name of the town that you are in as the name of your collage. Get into photographer mode and look at things from different angles. Having pictures from different angles will make your collage much more visually interesting, and you’ll be surprised how differently things look when you lay on the ground as opposed to staring straight down at it. If possible, take pictures in black and white and in color. Later you’ll be able to choose which is your favorite. While a picture in color may be beautiful, it can take on a different meaning in black and white. While you’re on your walk pick up leaves, twigs, and even flowers. You can flatten your flowers and leaves once you get home to get the pressed look on your collage.

These pictures show how a different angle on your photograph of flowers can change the picture entirely.
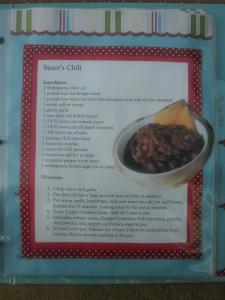
Build a Bird feeder

Things you’ll need:

Plastic ½ gallon milk container

Wire coat hanger

Newspaper

Sphagnum moss

Popsicle stick or small dowel

Scissors

After washing out the container with hot soapy water, let it dry. On the opposite side of the handle about halfway down, cut a hole in the container at least 2 inches wide. Half an inch below the hole, poke the popsicle stick or small dowel in to the container. This is the bird’s perch. Put the newspaper flat and spread the sphagnum moss at the bottom of the container. Birds like dryer lint too. Untwist the coat hanger and wire it around the handle of the container. Twist the hanger around a tree limb not too close to the trunk and tight enough so that it does not sway in the wind. Put bird seed in the feeder and wait for them to move in.

Make a Plant Person

Things you’ll need:

Pot with drainage hole

Potting soil

Hairlike plant such as Mexican feather grass or Carex

Outdoor craft glue

Paintbrushes, scissors

Craft supplies (glass stones, buttons, small polished rocks, tempura paint, permanent markers, twine, googly eyes, pipe cleaners, wine corks, colored felt, tiny shells, etc.)

This is a very easy project with few instructions. Sketch Ideas for your planters face on your pot to decide which one you like the most. After preparing your planter with potting soil and planting your Plant Persons “hair,” begin to glue on your craft supplies to fit the face style you chose, including it’s eyes, mouth and nose. You can even give your plant person glasses and ears if you choose, or perhaps a bow tie. Let your imagination wander. Tend to your planter person and watch it’s hair grow!

“Art is everywhere, except it has to pass through a creative mind.“ – Louise Nevelson- Sculptor

Sources:

www.Tlc.howstuffworks.com - Bird feeder picture and article.

www.HGTV.com/gardening - Planter person picture and article

Google Images – Flower image

Yahoo Images and www.FlickR.com - Flower image “Bug’s View”